Categories
Politics/Government

Iowa Republicans Just Made Life Deadlier for Trans People

I want to use my spare time doing game development, but instead I’m scrambling to figure out how to get my 11yo trans daughter on my insurance since the Iowa Republicans have decided that her existing insurance won’t cover the gender-affirming care she needs in or out of state.

We had to tell her that she couldn’t pee in the bathroom at school that she always pees in. The look on her face broke our hearts.

It might seem like no big deal, but it is. The Iowa Republicans passed a law to make my daughter more anxious and a bigger target for bullying.

When she needs to use the bathroom, she can’t just go. She has to be strategic now. She has to occupy her mind with worrying about going before her class on a different floor of the building or risk being too far away from the “special” bathroom to make it back in time.

“What if I pee my pants at school?” she worried last night before bed.

Let’s leave aside the ostracizing and bullying she’ll potentially endure when she has to use a “special” bathroom or wets herself because she couldn’t.

Laws about where my daughter can pee are deadly.

Did you know that lots of trans people find themselves getting urinary tract infections or kidney issues because they find themselves too anxious or worried for their safety in public restrooms?

People DIE from UTIs, especially if they find themselves discriminated against in healthcare the way trans people tend to be.

Thanks, Iowa Republicans, for cruelly making my daughter’s school and her bladder part of your battleground.

Instead of addressing hunger, homelessness, poison in our waterways, or anything of import, the Iowa Republicans decided that inflicting death and destruction on the most marginalized and already hurt people in our society was “being deemed of immediate importance.”

Categories
Game Design Game Development Geek / Technical

Freshly Squeezed Progress Report: Raycasting a Dungeon?

Last week, I reported that I was working slowly to build up the 2d-simulating-3d art and math to represent the dungeon for The Dungeon Under My House, my second Freshly Squeezed Entertainment project.

This past week I got a suggestion and decided to explore a different approach.

Meanwhile, there are mere hours left in my “reverse sale” for my leaf-raking business simulation strategy game Toytles: Leaf Raking. Soon it will revert to the regular price, so either get it now or get it later. Your choice, and thank you for your support either way. B-)

Sprint 10: Pre-production and initialization

Planned and incomplete:

  • Move player in dungeon view

Much like the previous week, I did not get to spend as much time on development as I would have liked. Between the Iowa legislature making life tougher for the most vulnerable, some home improvement projects, and my back hurting me potentially due to those home improvement projects, it’s been tough to make time to sit down.

A few weeks ago, one colleague suggested that I simply use an existing 3d-engine instead of trying to create a 2D tileset. Thanks for the suggestion, Ken, and I apologize that I will ignore this otherwise very sensible advice.

As I said last week about why I insist on ignoring this advice:

Because I’m stubborn, maybe. I wanted to try it, and now I’m in the middle of it.

I know 3D would make a lot of this work easier, but switching to 3D would mean needing to switch to an existing game engine, something I’m not ready to do because then it means abandoning my many years of code that I’ve built up. Maybe I’ll think about it if I am still trying to figure this dungeon rendering effort weeks from now.

But it’s fun to figure things out, and that’s part of the reason why I like doing it the hard way.

Well, in response to last week’s report, another colleague suggested that I look into making a simple raycaster.

Thanks, Joel Davis, aka joeld42.

I had originally looked up how to mimic the look and feel of 2D 1st person RPGs from the 80s and 90s, and I found Reddit posts and forum posts in which people basically said, “You COULD do it this very difficult and time-consuming way, OR you could use a 3D engine and fake the old look.”

And people would also throw in raycasting, much like how Wolfenstein 3D and Doom’s engines worked, but I didn’t pay much attention because I didn’t want to make a real-time 1st person game.

But Joel said “Doing it in 3d in your own engine, whether a raycaster, a simple SW renderer, or regular 3d with opengl or something, doesn’t need to be that hard, you can keep it simple” and followed up with “You should try it, it’s fun and super simple. I’d say it’s less work than the approach you describe in the blog post.”

He also sent a link to this neat tutorial and web demo: A First Person Engine in 265 Lines by Hunter Loftis

So I downloaded it, toyed with it, and changed some parameters and values to get a sense of how the code and math worked, and I also played with the demo, which impressed me even when I disabled the lightning and rain effects. It was fast and looked pretty good.

There are quite a few raycasting tutorials out there, some of which I read a long time ago, and some of which are new and I read this past week.

I particularly enjoyed Lode’s Computer Graphics Tutorial: Raycasting and the follow-up on rendering the floor and ceiling, which helped me triangulate an understanding of what Loftis was describing in the other tutorial linked above.

And I also loved reading about this voxel space demo.

What I liked was the idea that instead of needing to generate multiple images to represent a single wall or floor tile, I could have one image and let the raycasting engine handle making it look like it is being seen at an angle for me.

And what I especially liked was that the math and technique seemed straightforward enough to implement.

As I said above, I did not spend much time on development this week, but what I did do was prove to myself that I could modify my code to render the walls in vertical strips the way a raycaster would.

So here’s how my in-game hardcoded hallway demo looks when I have separate tiles for the back wall and the side walls:

The Dungeon Under My House - initial in-dungeon art

And here’s how it looked when I rendered the back wall and side walls using the same image but drawn with vertical slices:

The Dungeon Under My House - in-dungeon art using vertical stripes

Ignore the fact that I didn’t get the floor or ceilings in. I think you can hardly tell the difference between these two renderings. The second image isn’t raycasting. It’s hardcoded much like how the demo above is, in that I render the side walls until I hit the end of the hallway, then I draw a back wall.

Remember, though, that second screenshot shows me using only a single image for the wall, rather than separate images for the side walls which are a little clunky and awkward to create. I could easily throw in a different image and have a new wall tile that can be rendered in three ways without me needing to modify or create even more art.

Even if I don’t implement a raycaster, this technique of rendering vertical slices of an image looks good AND reduces my art-creation effort. It also means that my game download will be a lot smaller and take less time to load.

I could even get creative with both how it grabs portions of the source image and how it renders to the target location to perhaps create certain effects.

But I think I do want to implement the raycaster code. I want to be able to render walls seen from the sides, not just the direct hallway in front, and I want to be able to turn and have the code manage rotating in space with no extra effort.

And while I could use an existing engine and not need to implement any code to handle it at all, I don’t want to use an existing engine. I have my own code that I’ve been building up for years, and creating a raycaster using it seems like it will be quick, easy, and enjoyable enough. And being able to do things with my existing code is why I have existing code.

Thanks for reading!

Want to learn when I release The Dungeon Under My House, or about future Freshly Squeezed games I am creating? Sign up for the GBGames Curiosities newsletter, and download the full color Player’s Guides to my existing and future games for free!

Categories
Games Marketing/Business

It’s Creator Day! Pay 50% MORE for Toytles: Leaf Raking! #itchioCreatorDay

itch.io is a very indie-friendly platform for game developers, writers, musicians, and artists in general, and today is one of their Creator Days.

For 24 hours, itch.io will take no cut from any sales, which means the creators get to keep all of the profit.

Many creators are creating sales for the weekend to participate.

I’m taking part, but instead of discounting my game’s price, I thought I would increase it instead.

So from now until March 20th, you can pay 50% more than usual for Toytles: Leaf Raking, my leaf-raking business simulation game about responsibility and strategic thinking.

Toytles: Leaf Raking

I think the game’s original price is more than generous, and a temporary increase still puts it under the cost for a movie ticket or a monthly subscription to a streaming service.

If you want to get Toytles: Leaf Raking for Windows, Mac, and Linux, this weekend you get to support me even more by paying a bit extra.

I appreciate it, and I appreciate all of the itch.io creators who make this platform amazing!

To get Toytles: Leaf Raking, or to check out any other Creator Day sales, go to itch.io, and celebrate a creator by paying for their work, whether it is on sale or on reverse sale or not on sale at all.

Categories
Game Design Game Development Geek / Technical

Freshly Squeezed Progress Report: Dungeon Representation

In last week’s report, I talked about the math and art of drawing the dungeon areas for The Dungeon Under My House, my second Freshly Squeezed Entertainment project.

This past week I continued working on the dungeon representation.

Sprint 9: Pre-production and initialization

Planned and incomplete:

  • Move player in dungeon view

I was out of town and visiting with family, so I did not put in as much time as I could have, which meant not getting as much done as I was hoping to by the end of the week.

To create a simple dungeon map, I needed to finish creating the data structures to represent the dungeon. This work was the easy part.

I had a grid-based dungeon, so naturally grid cells would be the basic building block.

If I wanted to keep things simple, I could have had each cell represent either an empty block of hallway or a solid block of wall. Zero or one, and I’d be done. Maybe use different numbers to represent different types of walls or hallways.

But I wanted more flexibility. Each grid cell is made up of four walls, a ceiling, and a floor.

So instead of drawing the outside of a grid cell in the simple version, I would need to draw the insides of the grid cell.

I anticipate needing a companion tool to create the dungeon layout as this game develops, perhaps using something like Tiled, but for now, I just need to give myself a simple dungeon, so I hardcoded one.

Old games used 2D trying to simulate 3D because 3D wasn’t viable on the older computing power they were using. Today, the advice to make similar games is to use a 3D engine and try to replicate the 2D feel.

And this past week, I started to really get as sense of why that contemporary advice exists. Just to have a single dirt tile for the floor, I determined that there is no way to get around needing to create that same tile from different perspectives.

The Dungeon Under My House - floor tiles rendered to horizon

In this screenshot of my art mock-up in GIMP, the yellow dotted square can represent the player’s viewport. To create the left side floor tile, I had to extend the dimensions of the canvas left and right. Then, just to see how far it goes back to the horizon, I kept shrinking the new side tile by about two-thirds. There is a back wall that I placed as a representative for the player’s maximum visibility.

Many 1st person games show a dark dungeon with visibility extending only a few tiles ahead, which gives a great atmosphere but also has the practical benefit of limiting how much art needs to be created to represent it.

For me, I think I determined that I can scale the art in code and get the same effect, so I only need to draw the tiles that are in the nearest row. No need to create separate tiles farther away, because scaling will handle it for me.

But because I want areas of my game that might be well-lit and provide greater visibility, I need to create a lot more tiles that are seen from the side than I would if I followed the tradition, mainly because those tiles could be seen in the distance. So instead of maybe one or two tiles to the sides, it looks like I’ll need to create quite a few more.

And that’s just one tile! To break up the monotony, I will also want to create variations on that tile.

And I would still need the ceilings and the side-views of walls. Perhaps I can simplify the art needs by creating modular aspects of the floor, ceilings, and walls, so I can have one generic piece of art that gets covered by brick outlines, chunks of rock, smears of dirt, etc in different locations to give the appearance of a variety of art.

But I will work incrementally, and so for now I just want to render floor tiles. One tricky thing I needed to figure out was to figure out exactly which cells are being rendered in the first place. The player can be in an arbitrary location in the dungeon, and so “forward” is relative to the player’s orientation.

Basically, I would need to figure out which cells to render and where on the screen. A cell to the left of the player would need to render tiles that are in the correct perspective, which means knowing what perspective that cell should be in. Turning around would show that same tile in a different perspective, or not at all.

Again, 3D engines have solved these problems so that they are a non-issue, so why am I doing it this more difficult way?

Because I’m stubborn, maybe. I wanted to try it, and now I’m in the middle of it.

I know 3D would make a lot of this work easier, but switching to 3D would mean needing to switch to an existing game engine, something I’m not ready to do because then it means abandoning my many years of code that I’ve built up. Maybe I’ll think about it if I am still trying to figure this dungeon rendering effort weeks from now.

But it’s fun to figure things out, and that’s part of the reason why I like doing it the hard way.

Thanks for reading!

Want to learn when I release The Dungeon Under My House, or about future Freshly Squeezed games I am creating? Sign up for the GBGames Curiosities newsletter, and download the full color Player’s Guides to my existing and future games for free!

Categories
Game Design Game Development Geek / Technical

Freshly Squeezed Progress Report: Dungeon Art and Math

Last week, I reported that I was creating a house and basement, and I hinted at a location outside of the house in this Freshly Squeezed Entertainment project.

Since I officially announced that this project is called The Dungeon Under My House, I can now say that I’m building a dungeon. And yes, it will be under the house that I’ve created.

Sprint 8: Pre-production and initialization

Planned and complete:

  • Create dungeon view with ladder back to basement

Unplanned and incomplete:

  • Move player in dungeon view

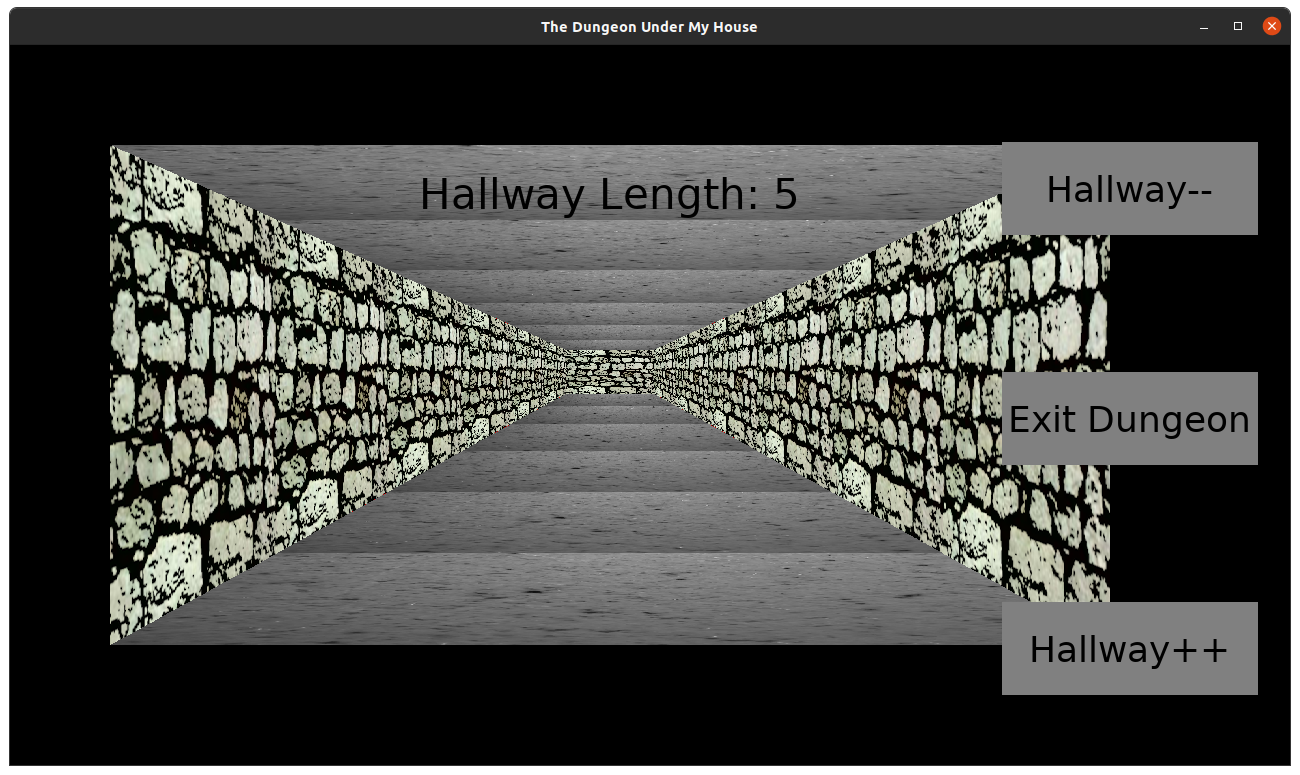
The Dungeon Under My House is going to be a grid-based, 1st person role-playing game, and instead of working in 3D, I’m going to use 2D art simulating 3D much like games from the 80s and 90s.

Because I wanted to make things harder on myself apparently.

Unfortunately, I am not an artist by trade, and while my programmer art is decent enough for most of my purposes, I am already realizing that I have a lot more work than I initially thought.

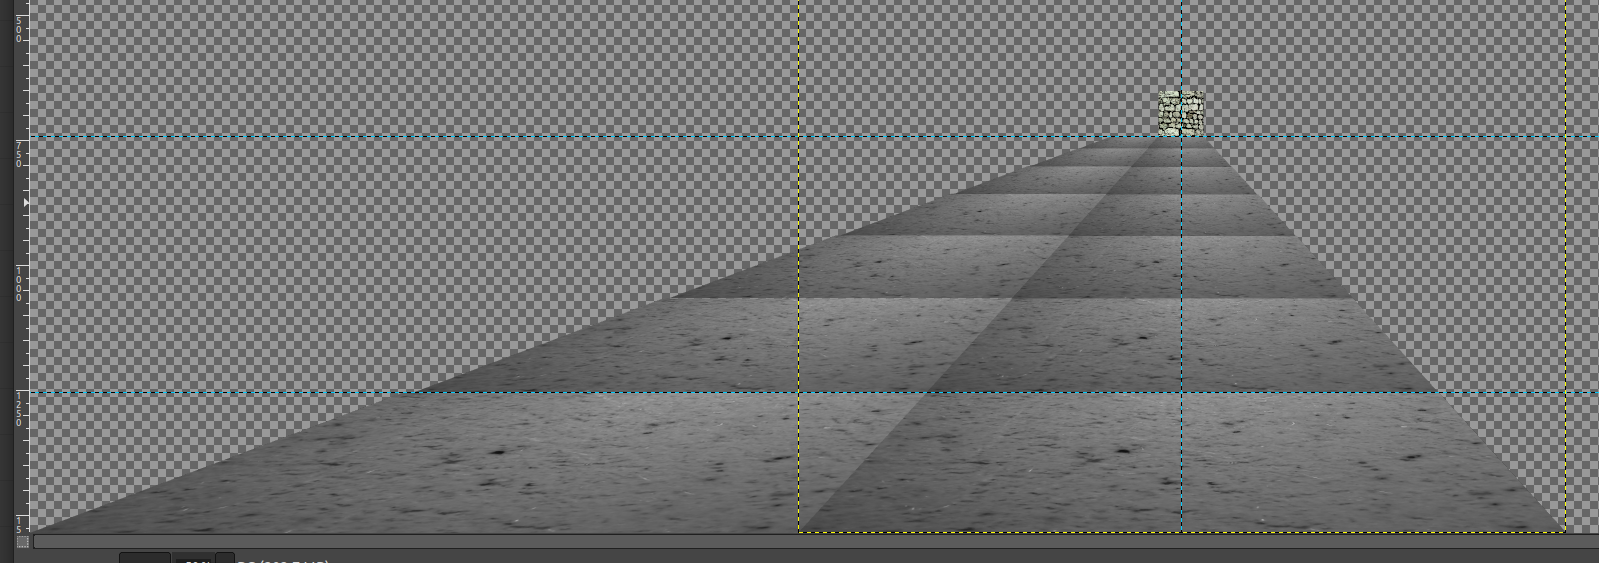
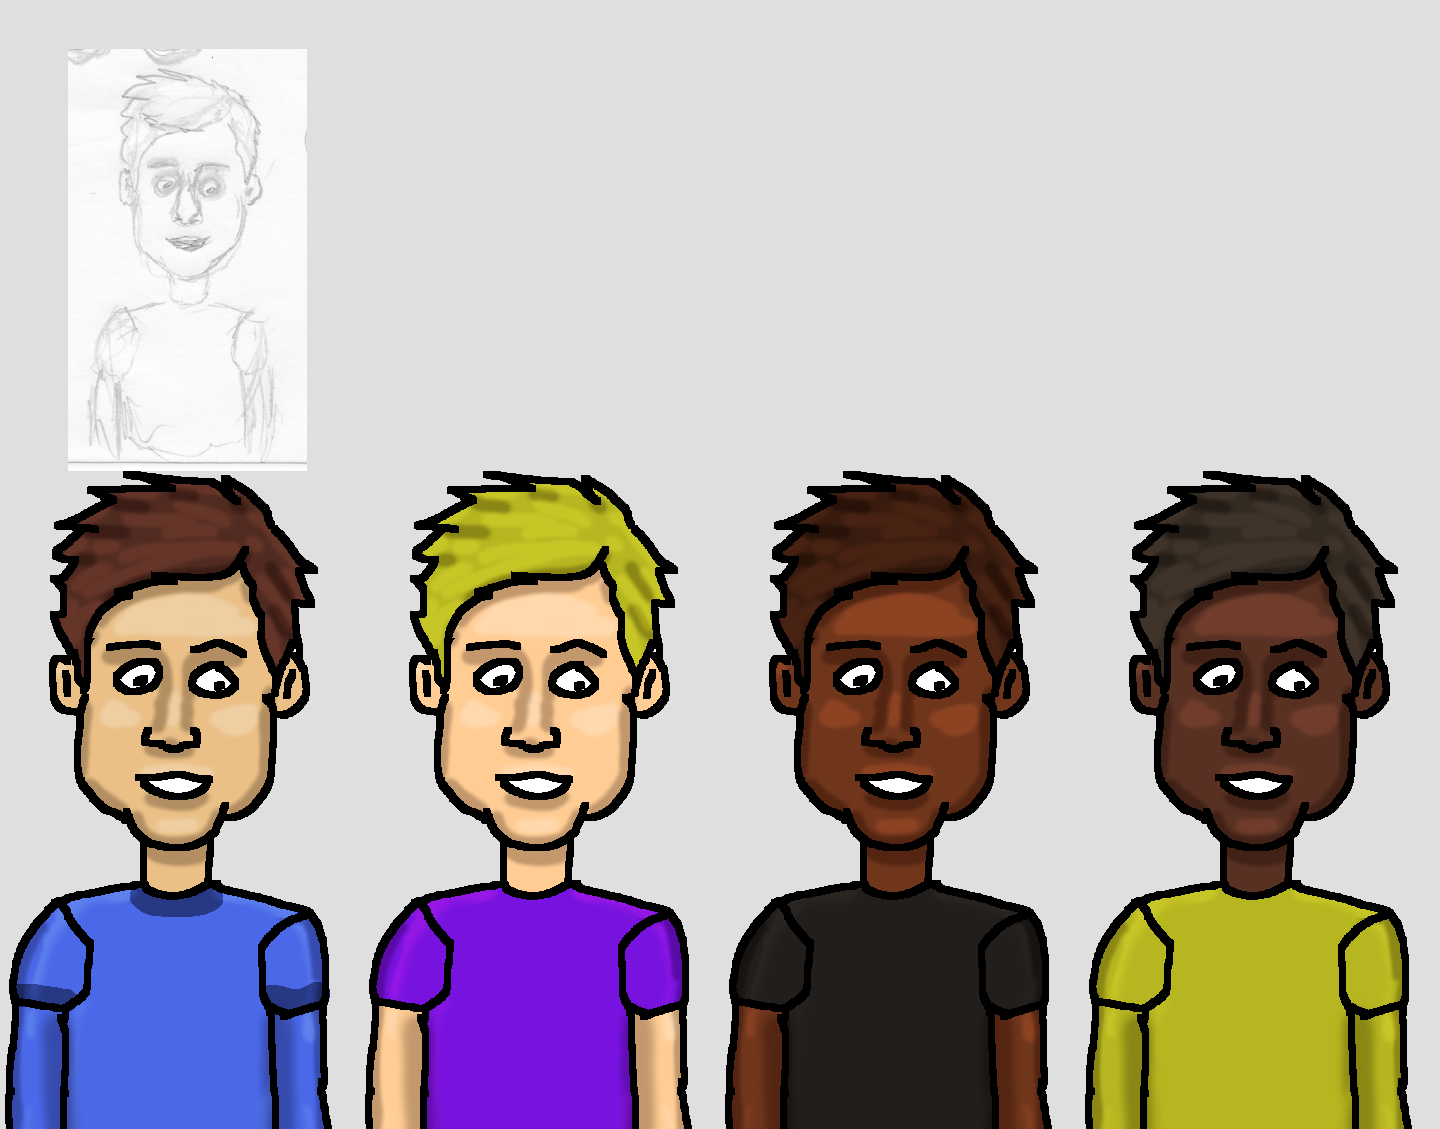
In January, I made this sketch:

The Dungeon Under My House sketch

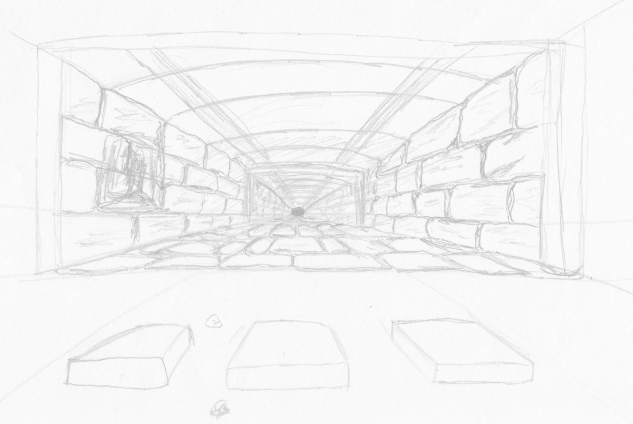
It was mainly to help me figure out what kind of art I would need to create.

Specifically, I wanted to have the ability to make each location in the grid look unique enough to be a mini-landmark. For instance, you might have a bunch of walls painted the same color in your home, but maybe the wall in your hallway has a pockmark, a nail hole, or even a drip of dried paint in a certain location that you would be able to recognize as belonging to that hallway’s wall.

Creating a single tile to be the floor wouldn’t get me there, and creating a handful of different tiles to add variety would only get me so far.

Instead, I want to create the floor out of a modular set of mini-tiles, so that I can mix and match. I could even render some of the mini-tiles at a slight angle to make them look like they are breaking up. Maybe it will work? I probably should do more mock-ups and tests.

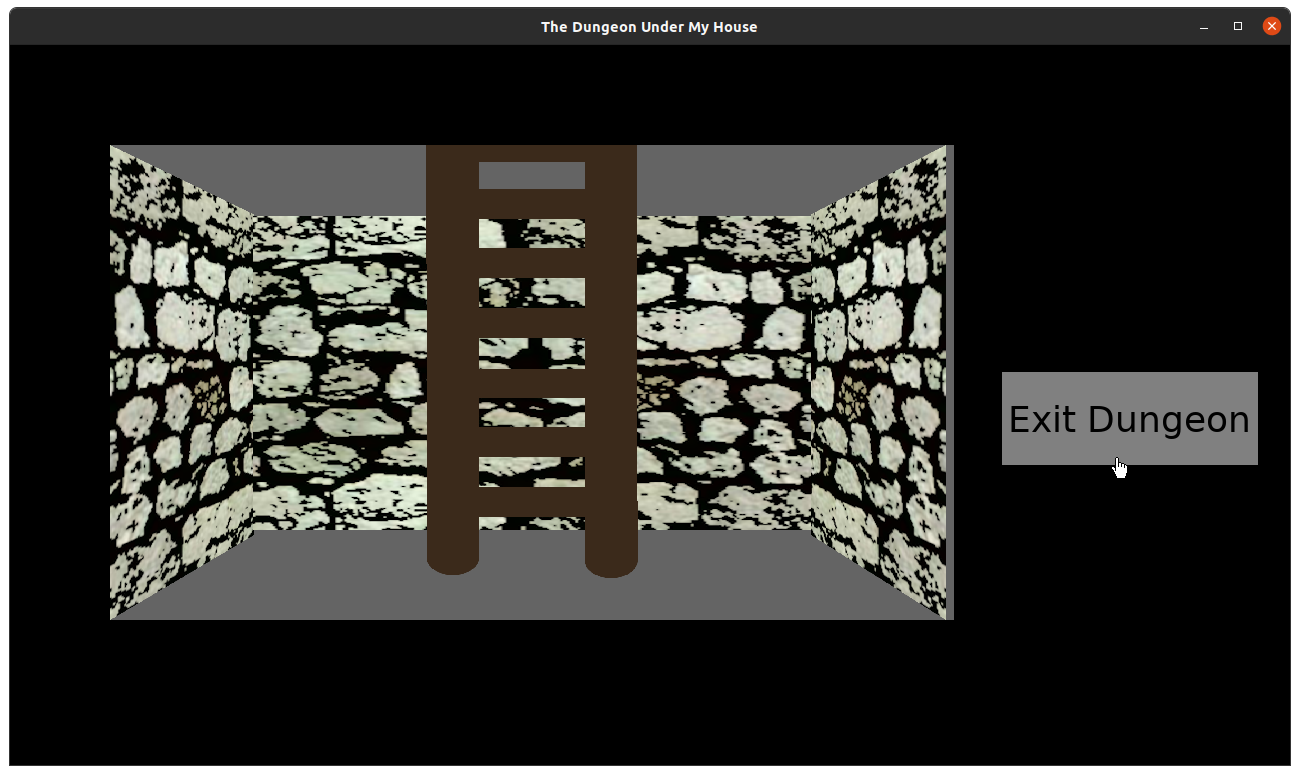
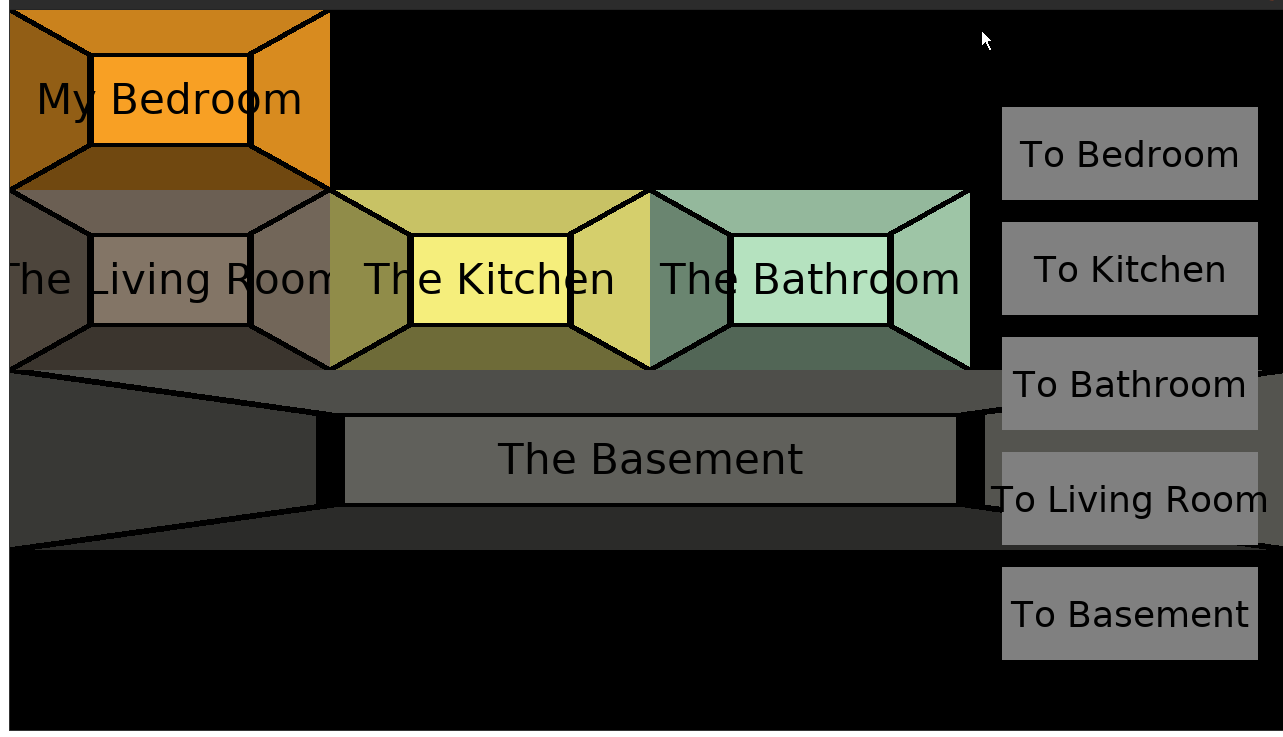
But for now, I needed to render a single location: the spot right under your basement. It needs three walls, a floor, a ladder, and a ceiling. I’ll worry about mini-tiles in the future.

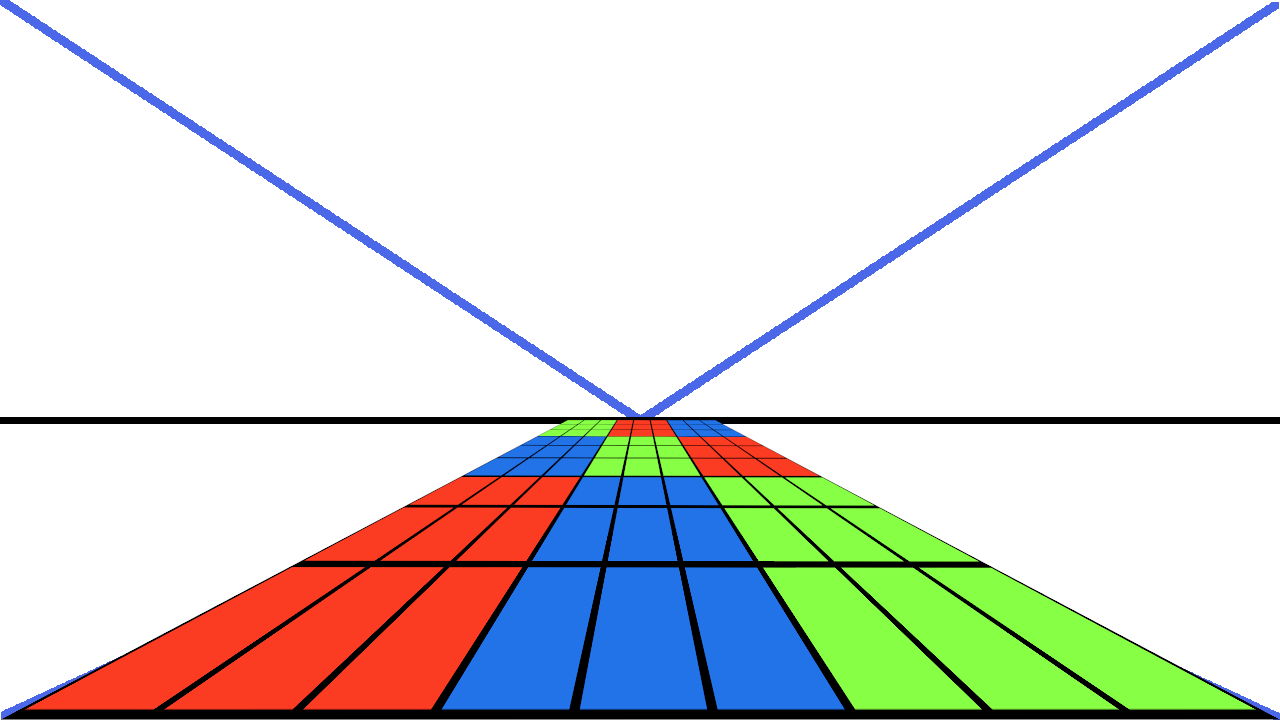
If you recall from a few weeks ago in Freshly Squeezed Progress Report: Laying Down the Groundwork, I was toying around with Gimp’s Uniform Transform Tool to see if I could get a good sense of how the art needs to be laid out to make it look like it is vanishing into the distance.

It looked…OK?

Using a perspective tool to see what the 9x9 grid of squares would look like as a floor

Well, now I needed to actually make something in game as opposed to mocked-up in an art program.

So I took a castle wall texture that I found on OpenGameArt, modified it slightly to give it a more sketched/cartoony look, and made a couple of skewed versions for the side walls. I made the ceiling a little shorter than the floor, mainly so that it wasn’t a boring perfectly centered horizon line.

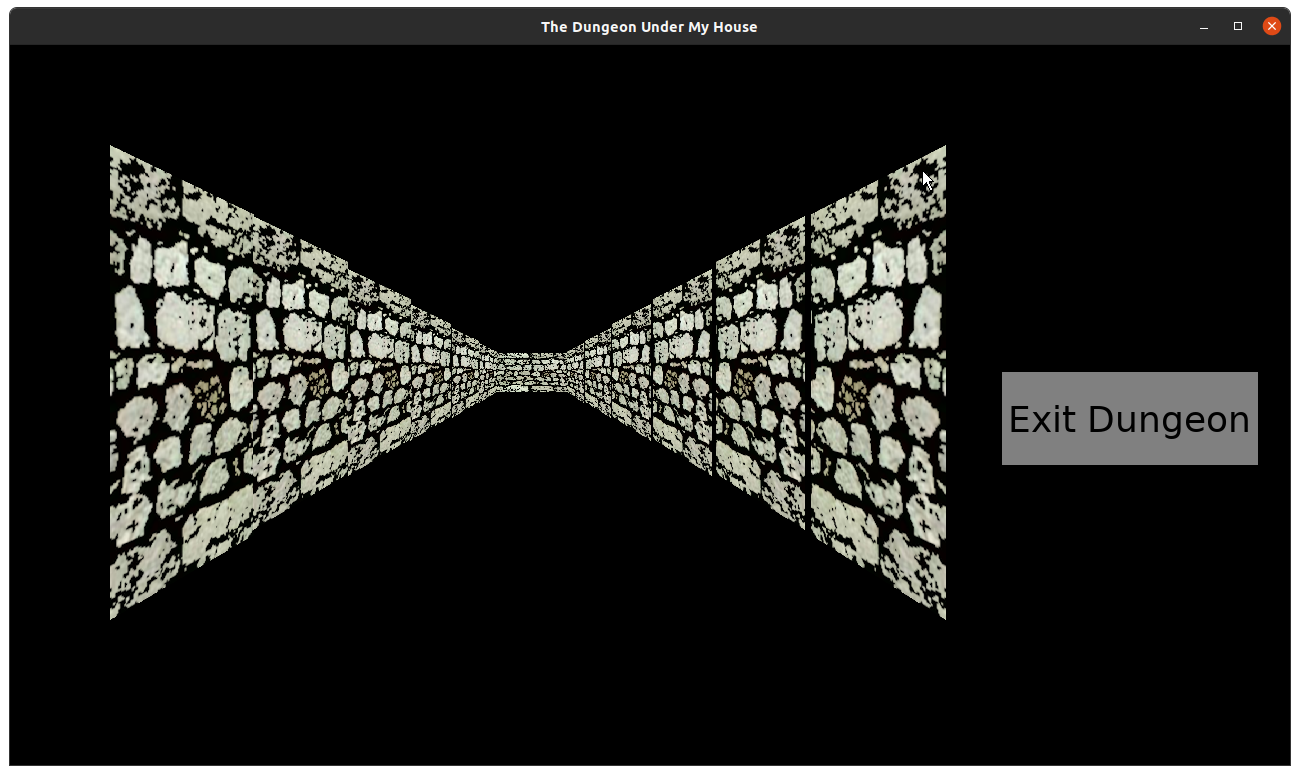
And it looked fine except that things weren’t really lining up well when I coded something to render this art.

The Dungeon Under My House - initial in-dungeon art

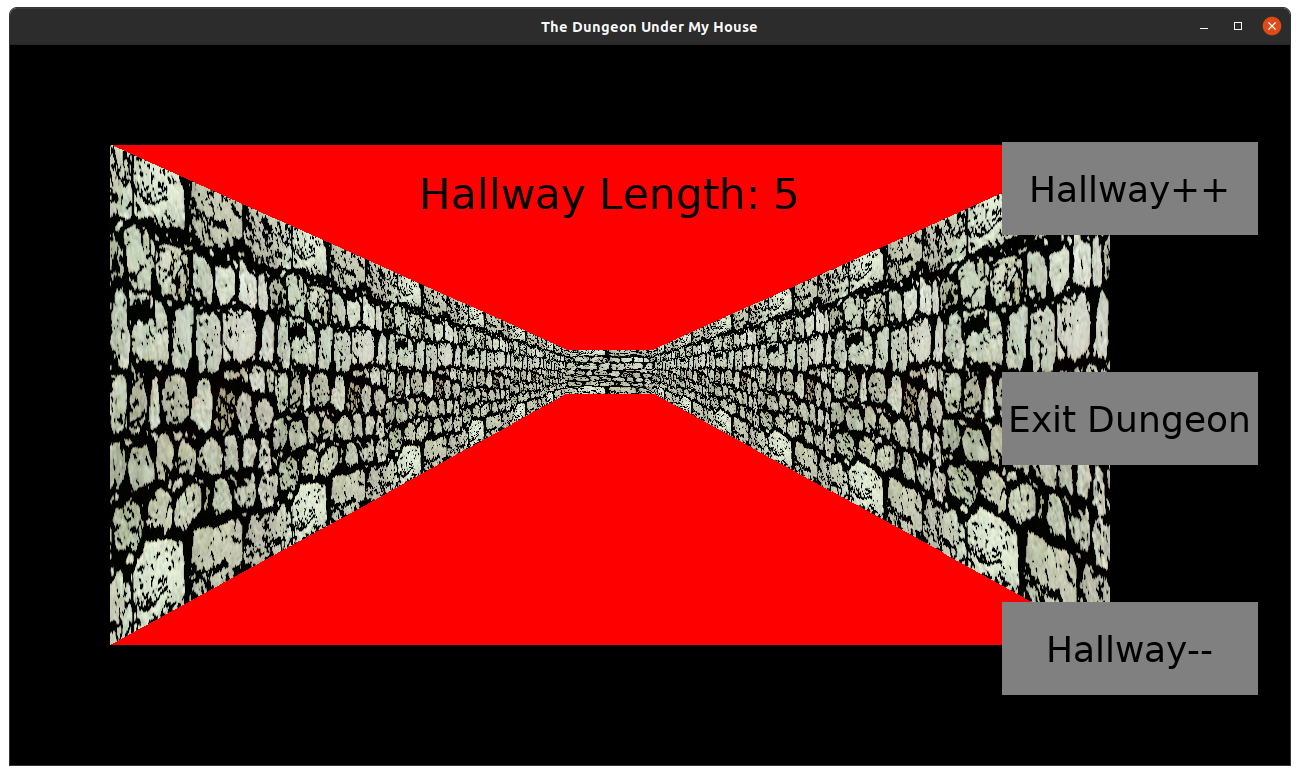
It was really obvious when I started trying to render a long hallway as an experiment, and I could see gaps between the walls as well as the fact that the walls didn’t line up at the top and bottom.

The Dungeon Under My House - initial in-dungeon art

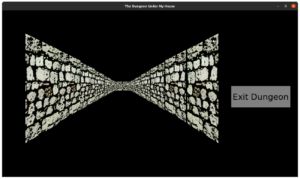
Basically, my math to figure out where to place the art wasn’t working, and it was breaking the illusion.

So I spent much of the last week figuring out the math for the placement of any particular wall segment based on the distance from the player’s viewpoint.

Skip ahead if you want to ignore the math.

The original wall art is 1024×1024. I created the side art at 256×1536. That is, the side wall is a quarter of the width and 1.5 times the height of the back wall.

With the back wall centered horizontally, that means that attaching the side walls on the left and right add another 50% of the width.

I want to be able to render the dungeon in an arbitrary viewport, something that could be potentially customized by the player. So I’m not hard-coding these dimensions, which is something I see in a lot of other games.

So, given an arbitrary viewport’s dimensions, I wanted the wall one tile away from you to be about 66% of the width and height of that viewport, and each time you see one more tile away it would be another 66% of the previous width and height.

The side walls would each take up about 16.67% of the viewport’s width, which totals up to about 33%. Intuitively, I had one-third for the side walls and two-thirds for the backwall, which should add up to three-thirds, or 100%, right?

And yet I was seeing vertical gaps where the tiles weren’t lining up horizontally. And it looked different depending on how the game’s window was shaped, since SDL2 was autoscaling much of what I was doing anyway. So sometimes there was a gap, and sometimes there wasn’t.

Was it rounding error? I’ve run into this kind of thing before in a previous project, when I discovered that the way I was rendering rectangular tiles for a game’s background meant that sometimes the rectangles had slightly different dimensions based on rounding errors. That is, a tile I expected to be 64×64 was sometimes 64×63. But I fixed that code years ago, and it wasn’t relevant here.

But the general concept seemed to be. 66% + 33% is actually only 99%, so maybe there was a 1% gap?

Eventually, I based the math on the actual relative dimensions of the art rather than the hypothetical numbers above. Plus, I used more precise numbers, like 0.666666667, which made things line up way better.

Plus, I found out that anti-aliasing introduced by the Uniform Transform Tool was producing slightly translucent pixels that meant my art itself had perceivable gaps, especially if I used a very bright color as a background.

So I remade some of the art and filled in all relevant translucent pixels, and it looked much better.

If you wanted to skip the math, you can continue reading here.

The Dungeon Under My House - initial in-dungeon art

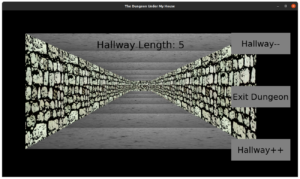
There are still gaps, especially at certain distances, but I have plans to address it, especially as I render more than a single hallway of tiles.

For the ceiling and floor, I used a picture I took in 2015 of the side of a glass I had a strawberry smoothie in. I turned it grayscale, skewed it, and it looks like a dirt/stone floor enough for now.

Next up, I wanted to make it possible to move the player within the dungeon, and so I spent time creating a way to represent the dungeon layout in code and a way to create those grid cells. I’m still working on it, but the dungeon is slowly coming to life. It may look a bit monotonous now, but it’s still a life.

Thanks for reading!

Want to learn when I release The Dungeon Under My House, or about future Freshly Squeezed games I am creating? Sign up for the GBGames Curiosities newsletter, and download the full color Player’s Guides to my existing and future games for free!

Categories
Game Design Game Development Geek / Technical

Freshly Squeezed Progress Report: Your House View, the Basement, and Beyond

In last week’s report, I implemented a few character customization options and implemented basic saving and loading for my second Freshly Squeezed Entertainment project.

Since then I worked on a simple view of the player’s home.

Sprint 7: Pre-production and initialization

Planned and complete:

  • Show house layout

Unplanned and complete:

  • Create house view’s basement

Unplanned and incomplete:

  • Create _____ view with ladder back to basement

When it comes to planning my week, I decided that instead of choosing a bunch of features/tasks to work on, I would only pick one. If I finish it early, I can pull in more work.

One key part of the game is the player’s home. I want the house to be a place where the player can regroup, collect supplies, and have various characters interact, among other things.

But I also recognized that much of what I have planned really only makes sense as a way to support game play that doesn’t exist yet. So I wanted to get through this part quickly. I have some reference art for what I wanted the various rooms to look like, but for now, a simple color-coded box with a label seems to work well enough.

Simple room view

Then I rendered the rooms relative to each other so you can switch between the House View and an individual Room View. For now, entering and leaving a room is all you can do. It’s not much, but it is a building block to more interesting work later, and the game saves which room you were in, so I know that part works.

Simple house view

The basement is going to be an important location, if only because it is where to find the entrance to the main non-house area of the game. I managed to get much of the work here done, but because it reveals a bit too much too soon, I won’t say more now.

HOWEVER! I will be letting my newsletter subscribers know those details as I formally announce this game this week, so if you want to know before anyone else, please subscribe to the GBGames Curiosities newsletter by following the link below! Otherwise, you’ll have to wait for my next update.

Thanks for reading!

Want to learn when I release updates to Toytles: Leaf Raking, Toy Factory Fixer, or about future Freshly Squeezed games I am creating? Sign up for the GBGames Curiosities newsletter, and get the 19-page, full color PDF of the Toy Factory Fixer Player’s Guide for free!

Categories
Game Design Game Development Geek / Technical

Freshly Squeezed Progress Report: Player Character Customization and Persistence

Last week, I reported that I had started player customization for my second Freshly Squeezed Entertainment project by allowing the player to change their character’s name.

I continued the effort this week.

Sprint 6: Pre-production and initialization

Planned and complete:

  • Create save file
  • Create player character

Now that I can rename a character, I could save the game to persist that rename, which meant revisiting the save file work I had started. I changed the main menu to allow me to either start a new game with initialized default data or load an existing game so I can continue where I left off. More directly, it allowed me to test that saving and loading works while also giving me a way to reset and try again.

Freshly Squeezed Entertainment game #2's play menu screen

Next up was letting the player customize their character’s pronouns and their appearance.

Ultimately, I want the player to be able to put themselves into the game. I want more pronoun options, but for now and to get something quickly into the game, the player can choose between he/him/his, she/her/hers, and they/them/theirs. Scripts and dialogues will use those pronouns to know how to refer to you and your party members. I have to brush up on my grammar and language rules, specifically for possessive pronouns.

The most exciting part was getting to finally put some graphics into the game. I wanted the player character on the screen, especially when customizing, and so I experimented with one of my pencil and paper doodles, scanned it in, and created a digital form with highlights and shadows. Here’s a mock-up:

Player portrait demo

I like the hand-drawn look of it.

Creating a bunch of different face shapes and facial features for the player to choose from seemed a bit daunting, so I thought it might be easier if I made it very modular. I started with creating a handful of face shapes to choose from, as well as skin colors. Again, like with the pronouns, I want to provide more options, but this initial start lets me get a feel for how intuitive this selection process can be.

Face and skin color customization

Face and skin color customization

The simple facial features are just meant to make it clear that these are faces and not just weird shapes. I want to eventually put in eyes, ears, noses, mouths, hairstyles, and accessories, as well as bodies and clothing, so this customization feature will get revisited.

Even now, I have plans to replace these face shapes. I made them quickly to put together this menu to allow the player to choose between them, but I think I lost the hand-drawn look that I liked so much.

If you wanted to customize your character in a game, what would you want as an option?

Thanks for reading!

Want to learn when I release updates to Toytles: Leaf Raking, Toy Factory Fixer, or about future Freshly Squeezed games I am creating? Sign up for the GBGames Curiosities newsletter, and get the 19-page, full color PDF of the Toy Factory Fixer Player’s Guide for free!

Categories
Games Politics/Government

Get the Trans Witches are Witches Bundle

You may have heard about the problematic yet popular wizard game based on the problematic famous author, but have you heard about the Trans Witches Are Witches Bundle?

For $60 (or $10 if you can’t afford it), you get “a bundle of witchcraft and wizardry without the transphobia, antisemitism, and alt-right grifters.”

You can support independent LGBTQ+ creators, you get what is currently 69 games and other items, and you can rest easy knowing that your money is not supporting powerful people putting more pain and suffering into the world.

There are role-playing games, shoot ’em ups, platformers, visual novels, and more. It’s a “bundle of over $300 worth of magic themed games, music, zines, and other things from LGBTQ+ creators.”

The sale ends on February 24th.

Categories
Game Design Game Development Geek / Technical

Freshly Squeezed Progress Report: Player Character Customization and More Groundwork

In last week’s report for my second Freshly Squeezed Entertainment project, I was updating my project’s infrastructure and figuring out the way I wanted to persist data from one play session to the next.

I found myself adding needed functionality since then.

Sprint 5: Pre-production and initialization

Planned and incomplete:

  • Finish initial design document
  • Create save file
  • Create player character
  • Create [redacted] environment layout

Last time, I realized that I couldn’t move forward with my save file work until I had something more substantial to save in the first place.

So I focused on creating the player character. I wanted the player to be able to customize their main character to their liking, so “Create player character” above has the following tasks:

  • Main player character gets a default name, nickname, gender, pronouns, portrait
  • Player can enter custom name and nickname
  • Player can choose pronouns from He/Him/His, She/Her/Hers, They/Them/Theirs, and (perhaps a few other major ones?)
  • Player can choose portrait from list
  • Create portraits

Some of these tasks turned out to be quite large. I did not do anything regarding portraits because my time was spent focusing on creating the ability to modify the player’s name.

If I was using an existing engine, much of this work would likely be provided for free with some framework. I would throw up an input box and be done.

But I’m using my own code that I’ve been working on for many years, and I didn’t have a ready-to-use text input box, so I would need to implement it myself.

In a previous project, I had hardcoded a text input box to let a player name a save file. My implementation was a little hacky, but I only needed it in one place, and the code was fairly isolated.

For this project, I knew I was going to need such functionality in more than one place, so I needed to create a reusable widget. I test-drove the functionality in, which required a few changes to some lower-level code to support it, and by the end of the week, I had a text widget that I can throw into my existing menu code. With it, I had the ability to rename the player character.

Renaming player's character

It’s exciting because from now on my own code lets me throw a text input box into a menu for free going forward, and all because of the investment of a few hours.

I expect it will take me almost no effort to change the player’s nickname, but I did find myself thinking, “What’s the point of the nickname?” Originally, I anticipated the nickname being a fun bit of personalization you can give you and your party members that otherwise serves no purpose. If you can give yourself an arbitrary name, then the name already provides personalization. So is a nickname redundant? Do only certain characters in the game refer to each other by their nicknames, and is that compelling enough? Should nicknames not be player-chosen but show up later in the game based on how the characters develop, such as a character who learns how to swim really well being called “Fish” or “Froglegs” or something like that?

It seems like a small thing to worry about, but there are clearly some questions here that are relevant to the game’s design. I might hold off on nicknames until I answer some of them.

The neat thing to see this week is that a lot of hardcoded things are starting to become less so. For instance, I started with a hardcoded text box that introduced the player. Then the text box and associated menu is generated depending on which script is being shown. Now the game keeps track of which script to show, so that when the customization menu closes the game can pick back up from where it left off. In the coming week, I anticipate that I’ll be able to demonstrate saving and reloading a game at an arbitrary point so that a dialogue being shown can be reloaded.

This game is going to be a lot more content heavy than my previous games. The work I’ve done so far may sound overly technical and even unnecessary in a world with free game engines and tools, and I’m getting impatient to put some game play together, but I’ve been investing in making the development of this project easier and faster for myself, and it is already paying off.

For now, I am very interested in making sure that players of this game can see themselves and their friends in it, and so allowing the player to customize their characters to represent themselves is important enough to not gloss over. I just hope that with my limited capabilities and resources that I don’t do too little.

Thanks for reading!

Want to learn when I release updates to Toytles: Leaf Raking, Toy Factory Fixer, or about future Freshly Squeezed games I am creating? Sign up for the GBGames Curiosities newsletter, and get the 19-page, full color PDF of the Toy Factory Fixer Player’s Guide for free!

Categories
Geek / Technical

Paying for Free Tools I Use Everyday: Thunderbird

The short version: I just signed up to contribute monthly to Thunderbird, and I think you should, too.

Here’s the link: Give to Thunderbird

Thunderbird is “the leading open source cross-platform email and calendaring client, free for business and personal use,” and I started using it when I was using Debian GNU/Linux as my main distro. I remember when Debian became very strict about licensing and I had to remember to call it “Icedove” due to trademark issues that have since been resolved.

I just checked, and I still have emails from 2004 at the earliest. For almost 20 years, Thunderbird has been a constant on my desktop computer. I don’t tend to delete a lot of emails, so my archive of folders and newsgroups totals about 7GB, and it acts as a great supplement to my memory. I think it would be larger if I didn’t delete any emails, but I do in fact do some tidying up occasionally.

While it is possible that there are other email clients, I have never found a reason to jump ship. I love having offline access to my email. I love the calendar extension which allows me to have offline access to my otherwise online calendars, much like how my phone’s calendar app fulfills that function for me. I like that encryption just works. When I was part of a trade association that used private newsgroups, I liked that I was able to participate without needing to find another application. I like the rules I setup to filter newsletters and other subscriptions into appropriate folders. I like that it is incredibly easy and fast to search through those 7GB of email for a receipt for a purchase I made or a phone number of someone I met at a conference.

I am sure I could be taking advantage of more plugins and extensions. Feel free to tell me your favorites! But I have been very happy with Thunderbird for a long time. It does its job, and it does it well. It’s a key part of my daily life.

Also, not only is Thunderbird free-as-in-speech software, it is also free-as-in-beer. Unlike other “free” options, I don’t have to worry about advertising or data harvesting. It is truly free, and I really like that fact.

The other day, I saw this appeal:

Keep Thunderbird Alive appeal page

I don’t keep tabs of Thunderbird’s relationship with the Mozilla Project. I know at one point it was spun off as its own thing, then came back, and now apparently it is part of MZLA Technologies Corporation, which is a wholly-owned subsidiary of the Mozilla Project.

My understanding is that Firefox is the big world-impacting project, and Thunderbird is not nearly so. Everyone browses the web, but not everyone needs an email client or a newsgroup reader. Most people use webmail of some kind.

So while the Mozilla Project focuses its love and care on Firefox, especially in terms of financial support for necessary infrastructure, it seems like Thunderbird needs to find its own help more and more.

But I’ve found great value in this email client, and I decided that I could afford to make a monthly contribution.

I admit that the $5/month I contribute isn’t much. I don’t make much of anything with this business yet, so another $5/month expense is a little painful. When I do start making more, I will be increasing my contribution.

But for now, I know that $5 is more than $0, and every bit helps. And I can write this post to encourage you to chip in, especially if you find Thunderbird as useful as I have. Give here: https://give.thunderbird.net